1. Basic information and channel
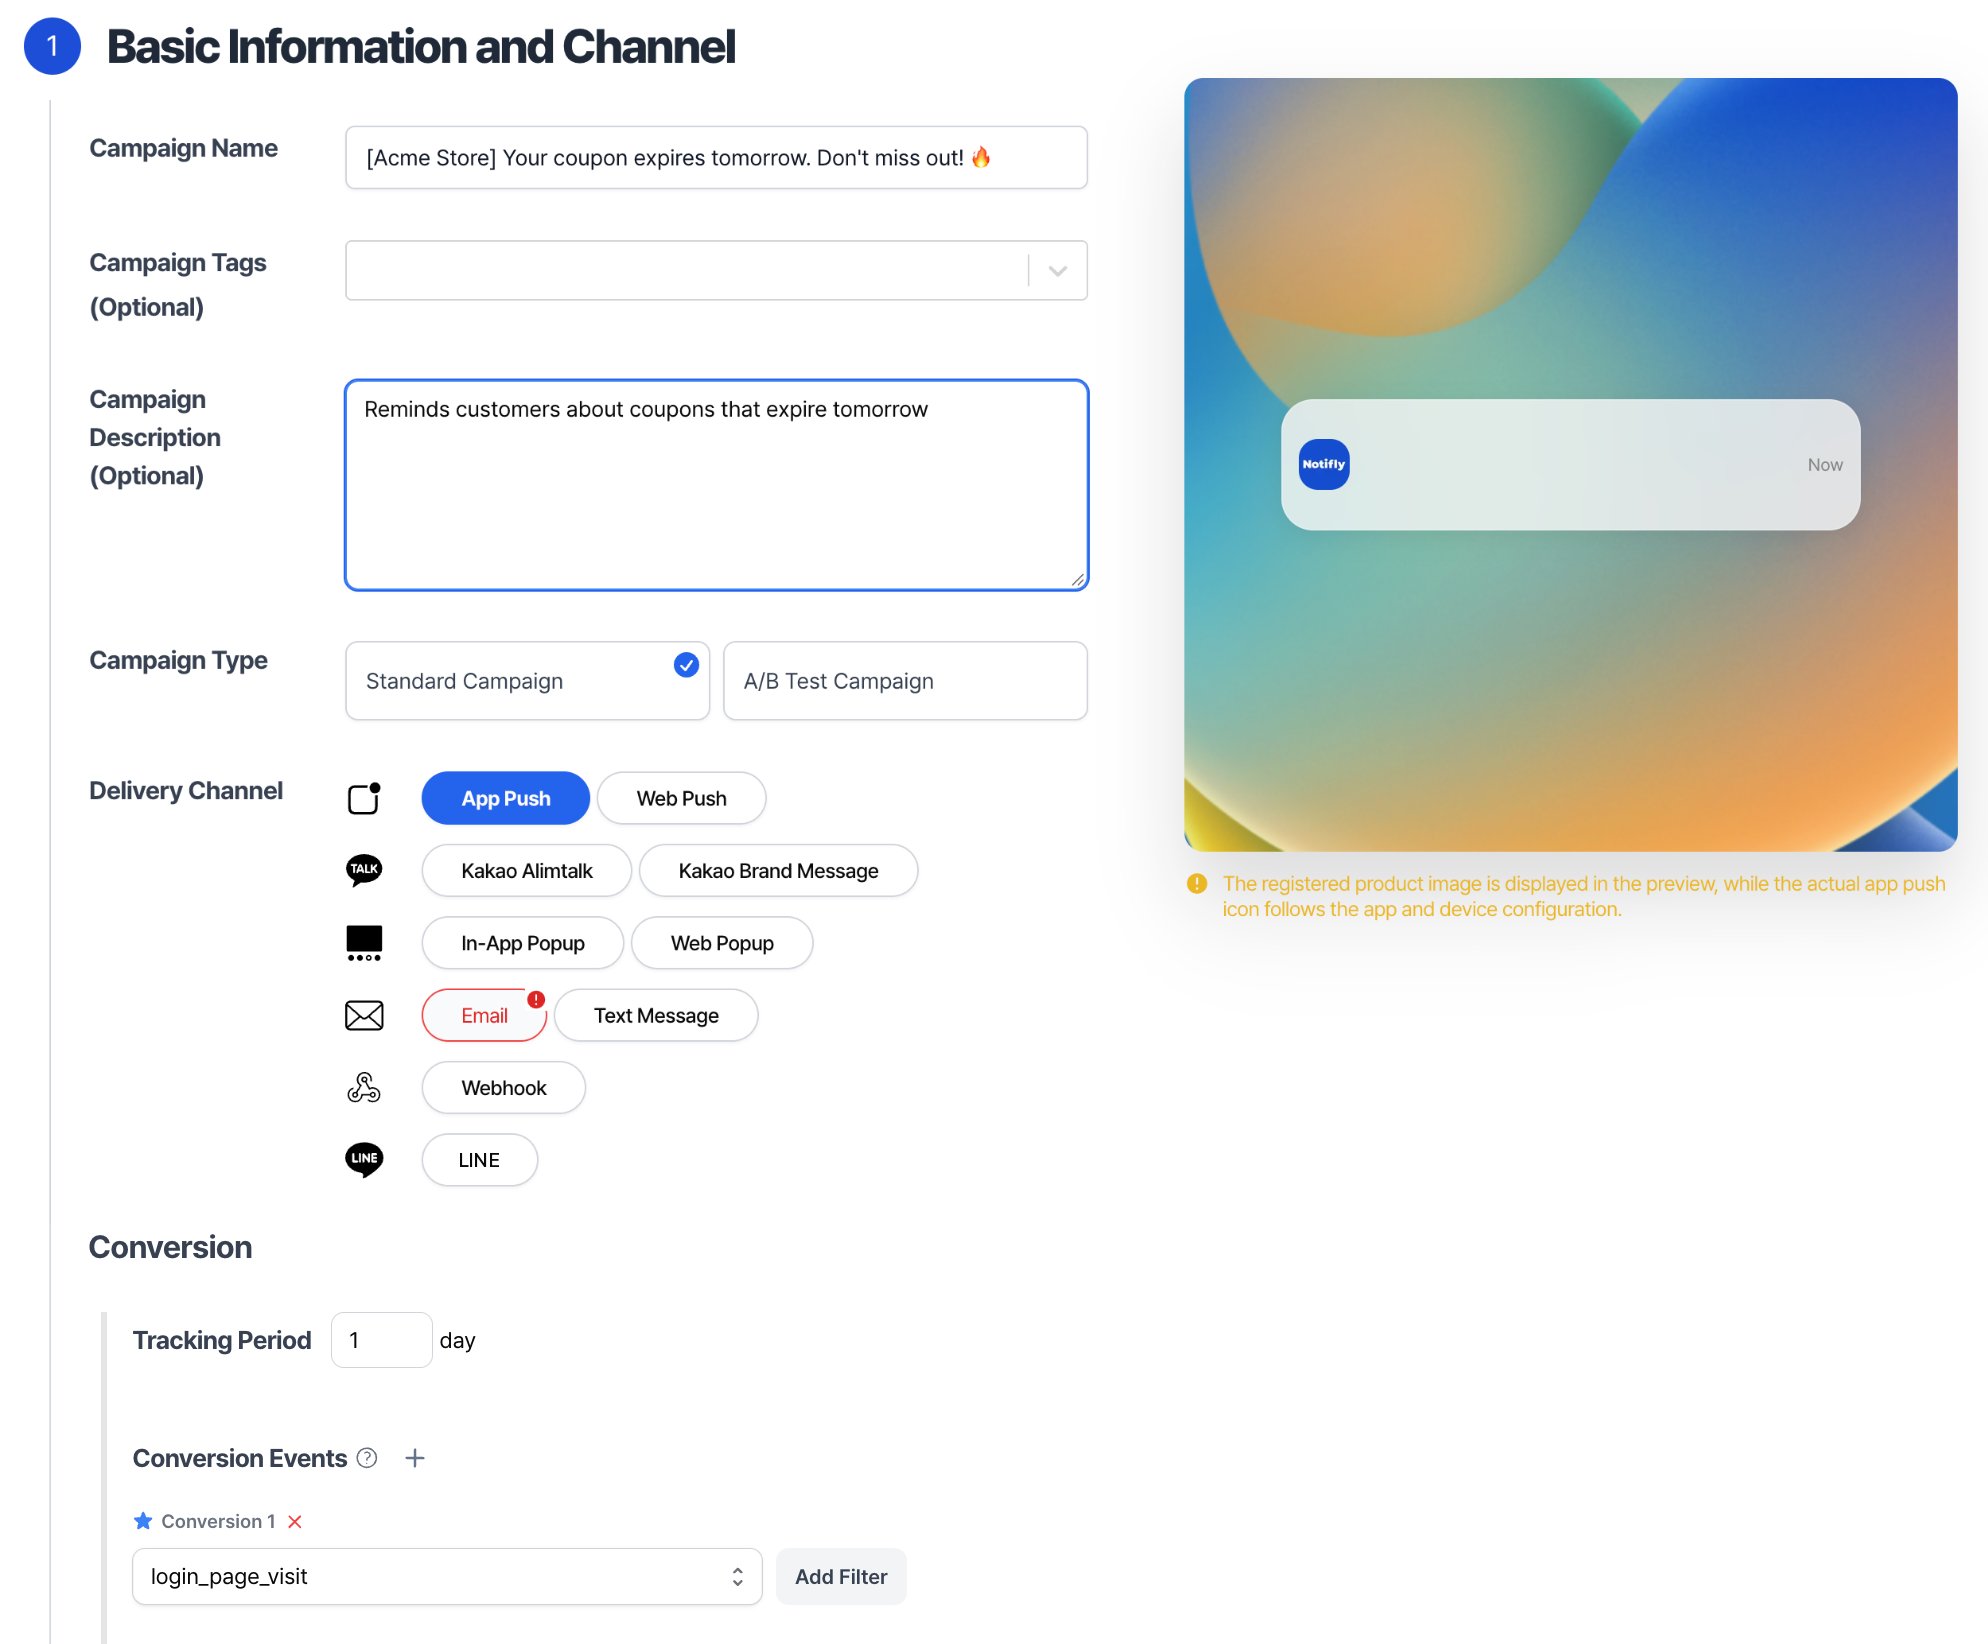
- Enter a Campaign Name that makes it easy to find in the campaign list.
- Use Campaign Description (Optional) for internal notes about the campaign.
- In Delivery Channel, choose a channel such as push, KakaoTalk, a popup, or SMS.
2. Delivery timing
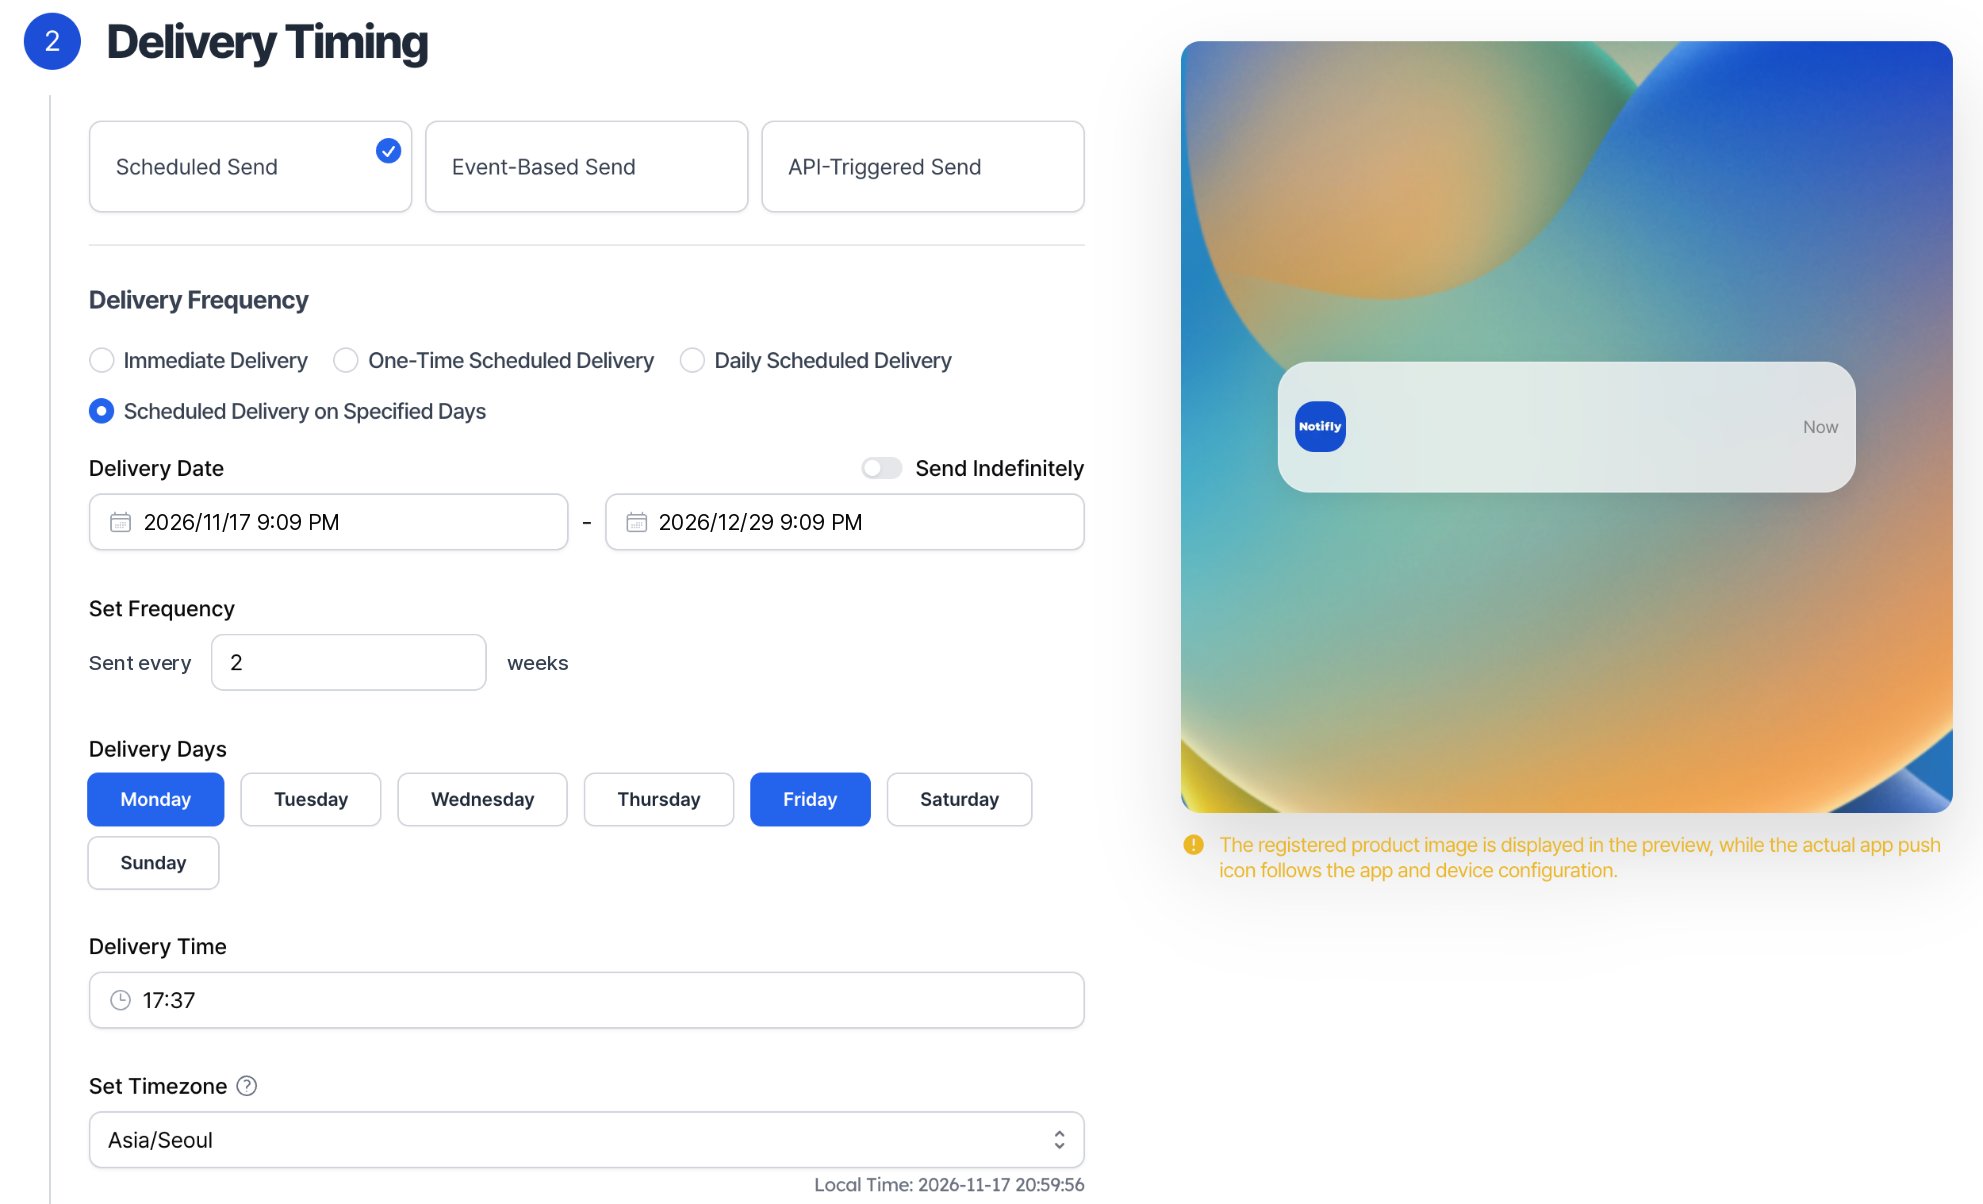
Under Delivery Timing, choose Scheduled Send, Event-Based Send, or API-Triggered Send.If you send to recipients in other countries, see Manage campaigns across time zones and daylight saving time. For recurring campaigns that use a named time zone, the local send time can shift after a daylight saving time change. Recipient’s time zone uses each recipient’s own time zone.
2.1. Scheduled sends
-
Immediate Delivery
- Click Final Confirmation to review the campaign. Click Create Campaign, then click Create Campaign again in the confirmation dialog to start sending immediately. Messages that have already started sending cannot be recalled.
-
One-Time Scheduled Delivery
- Choose a date and time for the campaign to run.
- You can cancel a one-time send scheduled in a single time zone only if more than five minutes remain before the scheduled send time.
-
Daily Scheduled Delivery
- The campaign sends at the time you set each day from the start date through the end date.
-
Scheduled Delivery on Specified Days
- Set the days and time for the campaign to send between the start and end dates. You can also set the number of weeks between sends.
- For example, send every other week on Monday and Friday.
- Set the days and time for the campaign to send between the start and end dates. You can also set the number of weeks between sends.
2.2. Event-based sending
Use an event-based campaign to notify a user when they trigger a specific event.- Use the Client SDK to record an event when a user takes an action in your app.
- Use the HTTP API to send user-specific and service-wide events to Notifly, such as an event marking the end of a sale.
- If you already use Amplitude, use the integration to forward your existing events to Notifly.
-
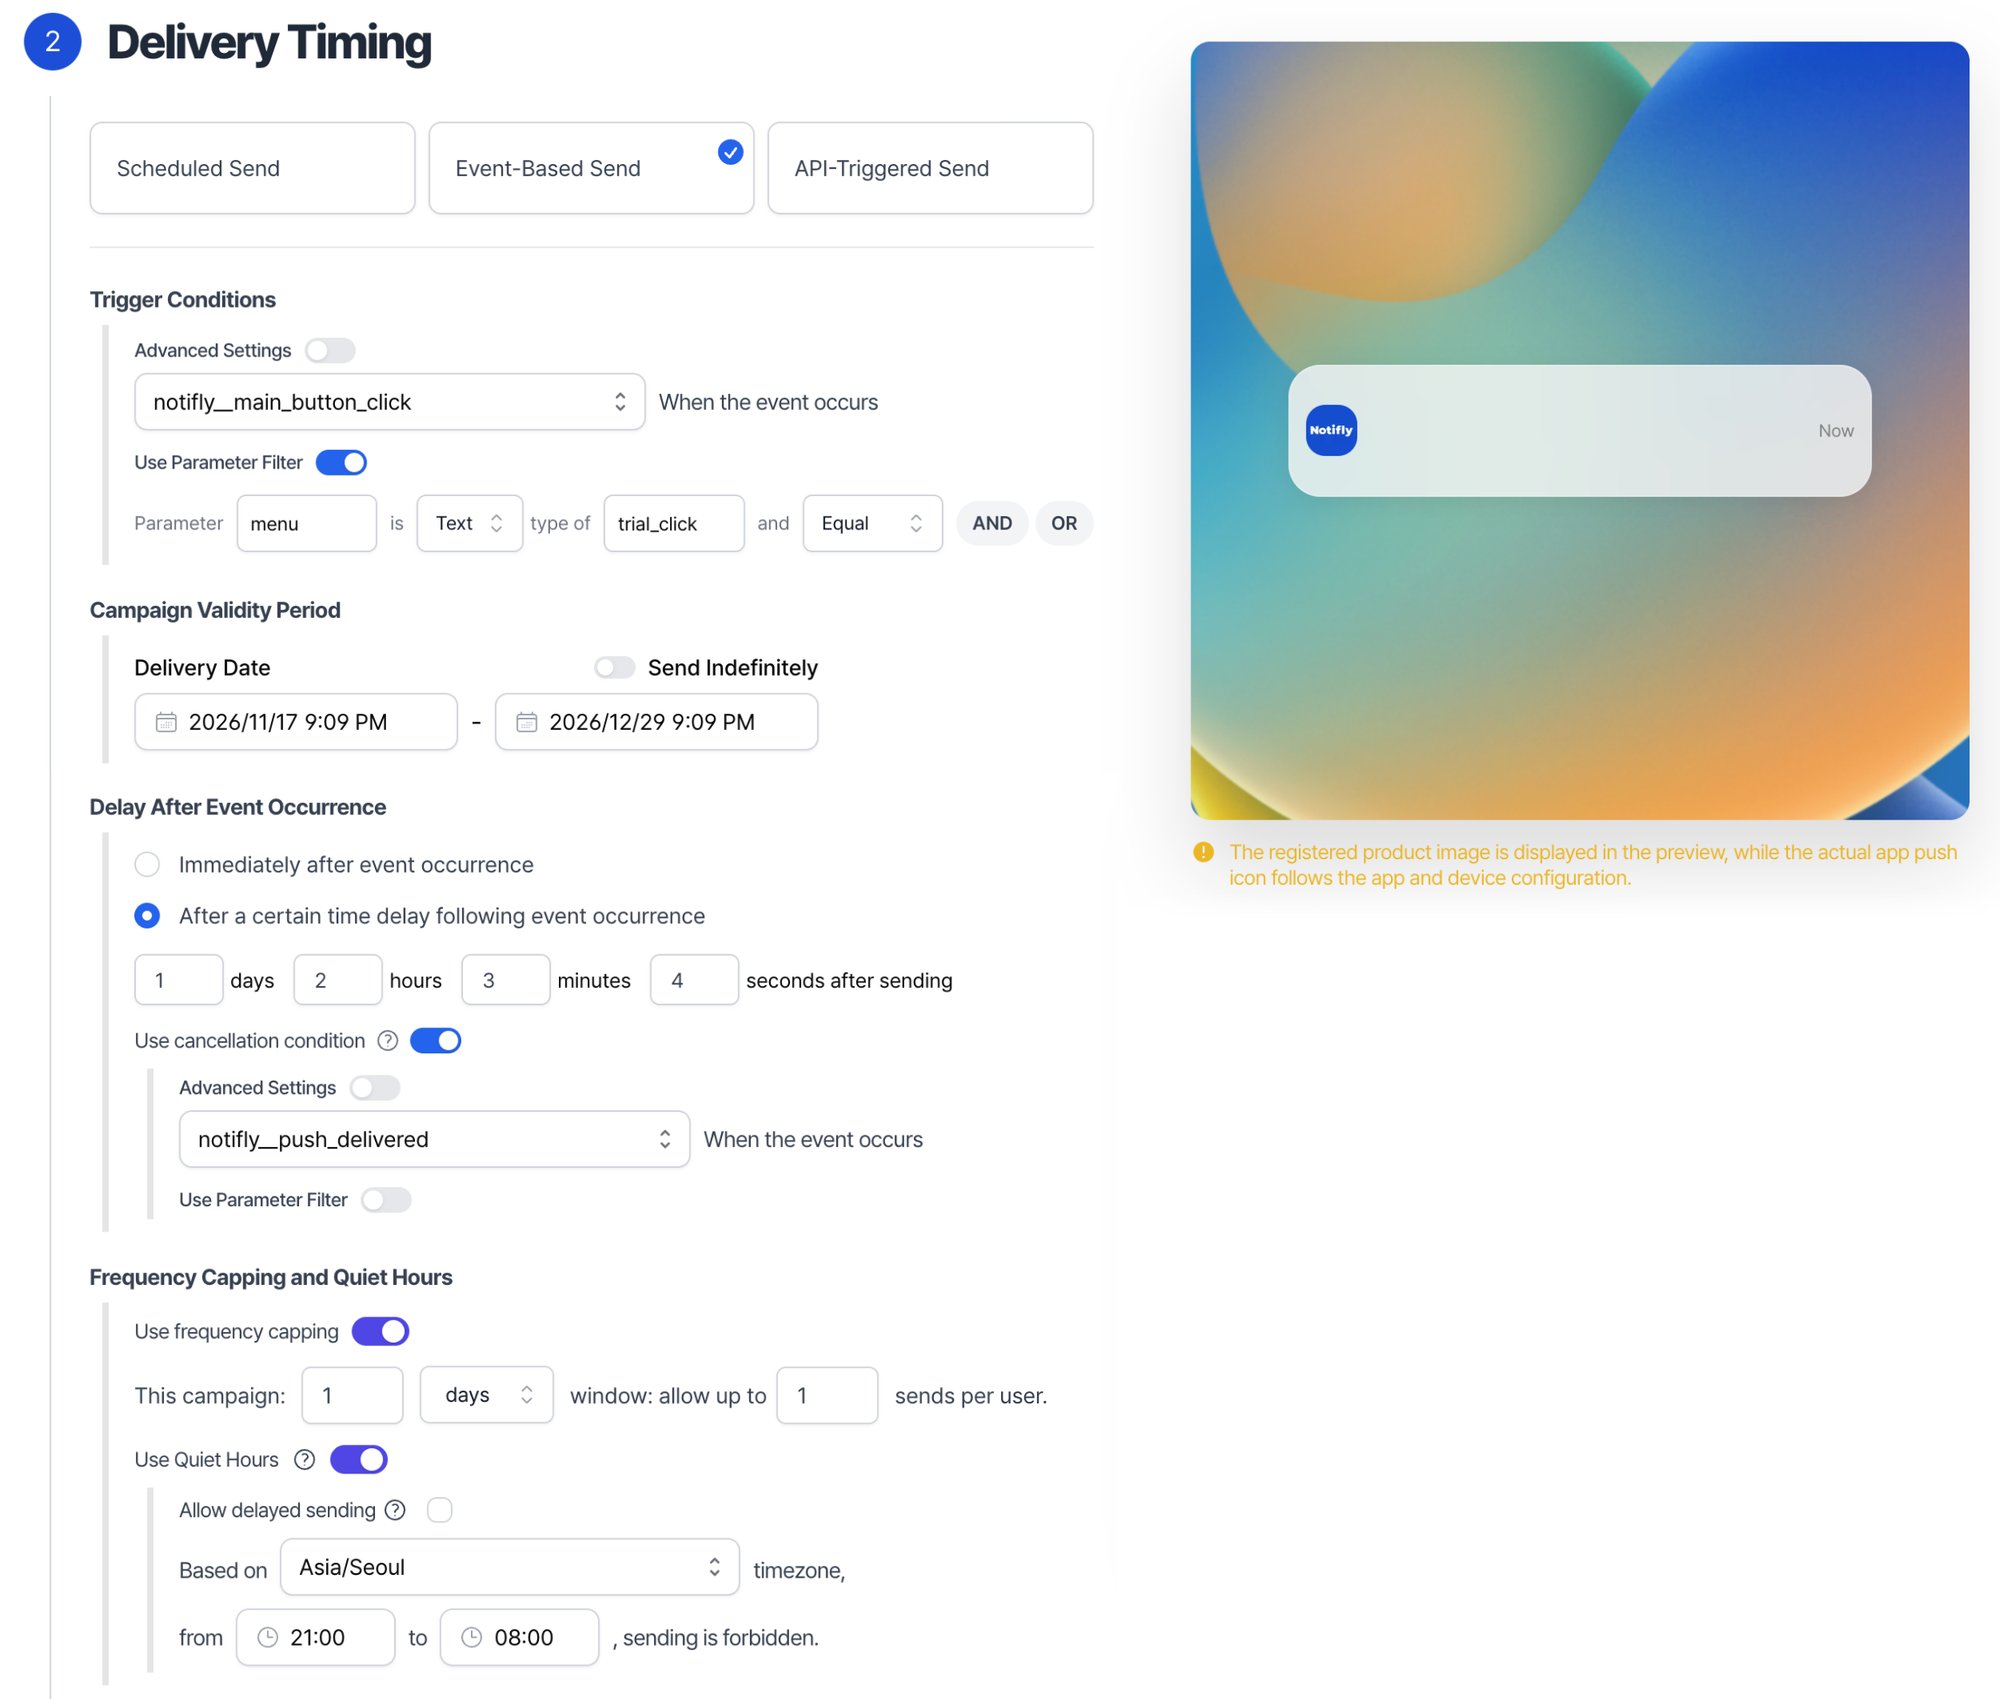
Under Trigger Conditions, select the event that triggers the campaign. You can enter the name of an event that has never occurred.
-
Select Use Parameter Filter to trigger the campaign only when the event includes a parameter value that matches your conditions.
- For example, if
main_button_clickincludes the event parametermenu, send only whenmenuequalstrial_click.
More event parameter filter examples
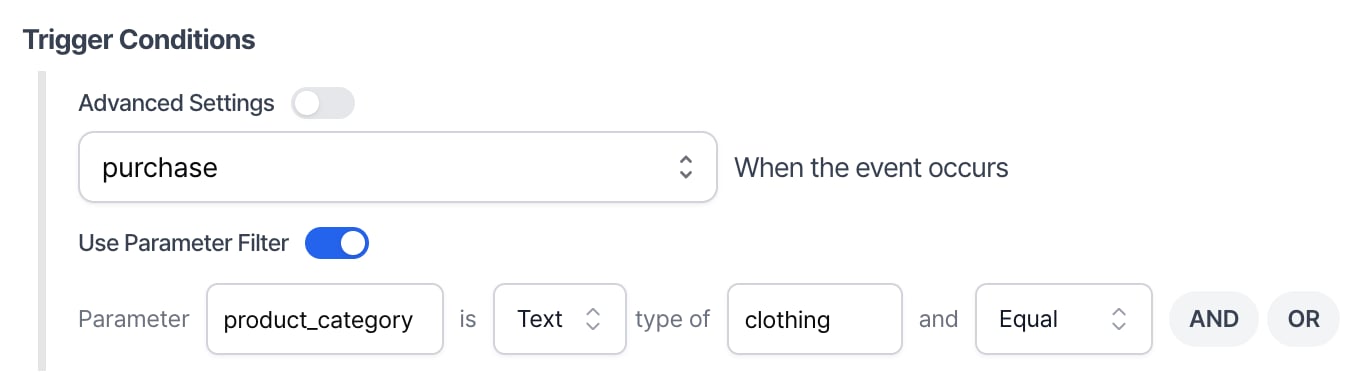
- If the
purchaseevent includes aproduct_categoryparameter, send only when the parameter equalsclothing.
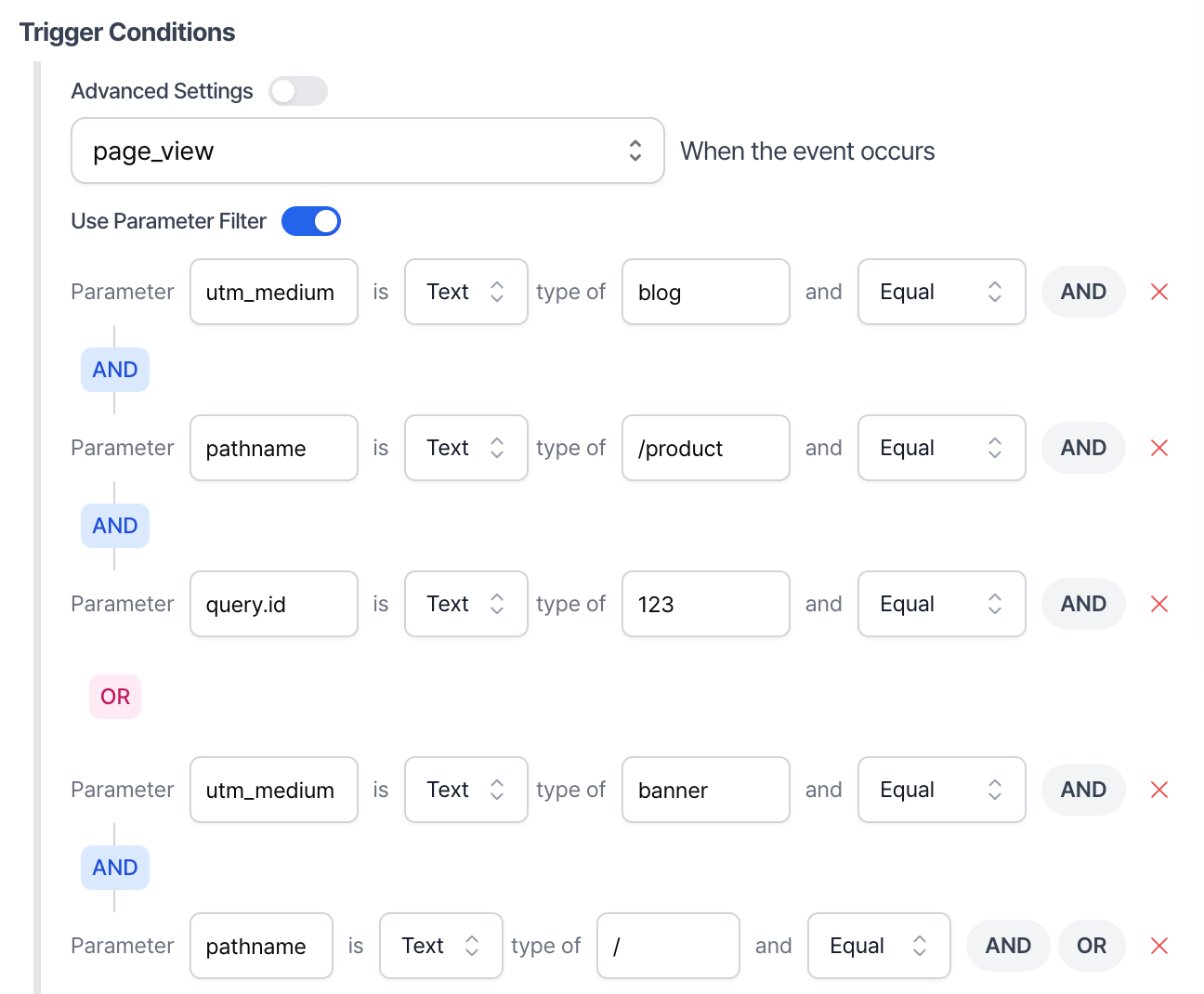
- In this example, the campaign sends if the user came from
blog, visited/product, and had a query parameteridof123. It also sends if the user came frombannerand landed on the home screen (pathnameis/).
page_viewincludesutm_medium,pathname, andquery.id. - For example, if
-
Select Use Parameter Filter to trigger the campaign only when the event includes a parameter value that matches your conditions.
- Set the start and end dates in Campaign Validity Period. Events can trigger the campaign during this period.
-
Under Delay After Event Occurrence, choose whether to send immediately after the trigger or wait for a set time.
-
If the send delay is at least five minutes, you can turn on Use cancellation condition and choose an event that cancels the pending send.
-
For example, cancel a user’s pending send if the same user records
notifly__push_deliveredwithin 1 day, 2 hours, 3 minutes, and 4 seconds afternotifly__main_button_click.You can schedule a promotion to send one hour after a user logs in and usepurchaseas the cancellation event. If the user buys something during that hour, the promotion does not send.
-
For example, cancel a user’s pending send if the same user records
-
If the send delay is at least five minutes, you can turn on Use cancellation condition and choose an event that cancels the pending send.
- Turn on Use frequency capping to prevent repeated messages in a short period, for example, when the same user repeatedly triggers the event. See Frequency capping.
-
Turn on Use Quiet Hours to set when the campaign cannot send.
- To send blocked messages after quiet hours end, turn on Allow delayed sending.
The scheduled send time can differ from the end of quiet hours after a daylight saving time change. See Delayed delivery around daylight saving time changes.
2.3. API-based sending
You can trigger a Notifly campaign directly through the HTTP REST API. See the Campaign Triggering API for the request format.- Specify the target audience in the API request body. The console does not let you select an audience for this campaign type.
Example API-triggered campaign
Example API-triggered campaign
-
This campaign uses the sample code in the Campaign Triggering API reference.
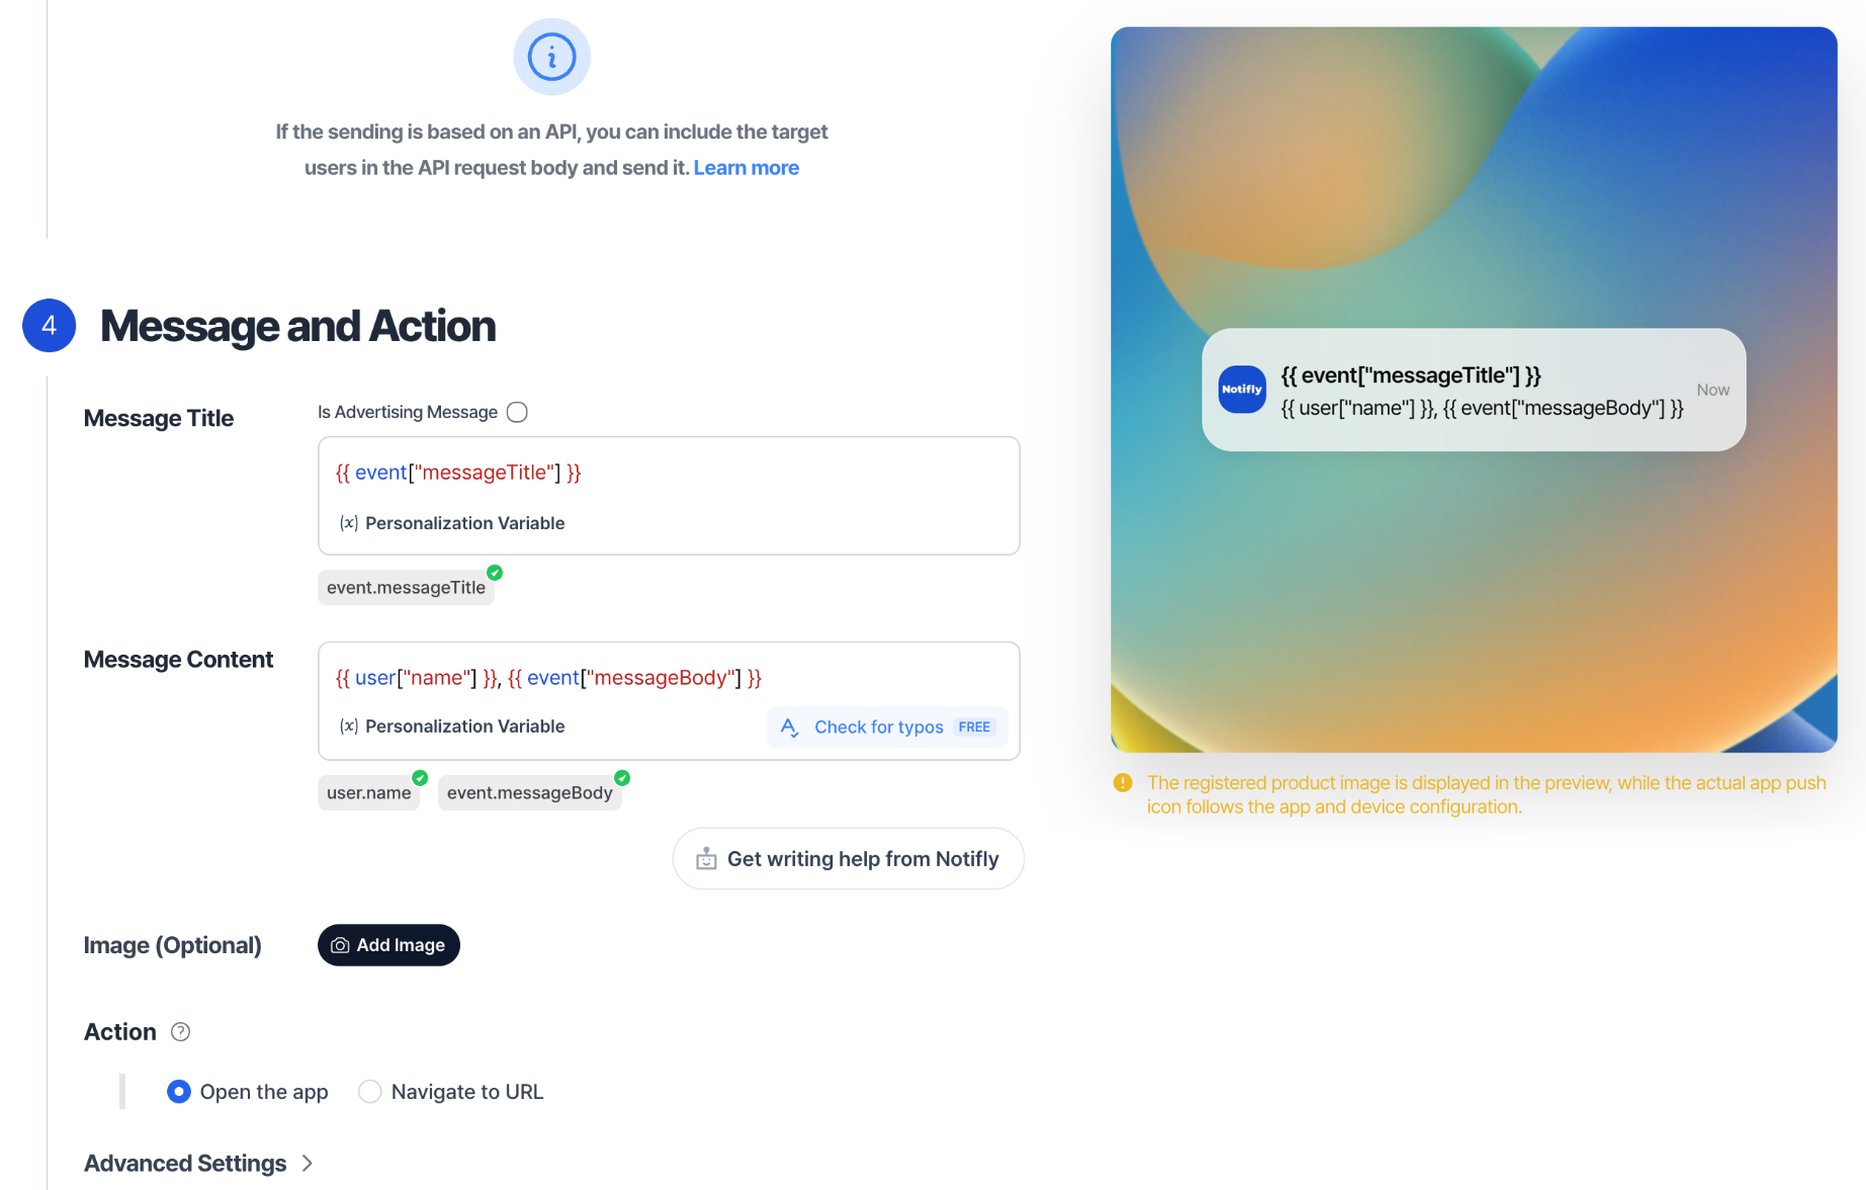
- The example assumes that the user has a
nameproperty.
3. Target audience
See Set the target audience to choose who receives the campaign.4. Message and action
See the guide for your channel to set up the message and its actions.5. Analysis configuration
If you are creating an A/B test campaign, set at least one conversion event. For a standard campaign, conversion tracking is optional.- Under Conversion Events, choose a user action to track as a conversion.
- In Tracking Period, enter a value from 1 to 14 days. For total conversions, the period starts when the message is successfully sent or the popup is shown. For direct conversions, it starts when a click is recorded. Enter
1for a 24-hour window.
- In Tracking Period, enter a value from 1 to 14 days. For total conversions, the period starts when the message is successfully sent or the popup is shown. For direct conversions, it starts when a click is recorded. Enter