
다음 기능을 지원합니다:
- 기기 정보를 노티플라이에 등록하여 푸시 알림 수신 및 인앱 팝업 노출 (인앱 팝업은 Foreground 상태에서만 표시됩니다)
- 이벤트 및 유저 정보를 노티플라이와 연동하여 캠페인 타깃팅 및 분석 활용
- 유저 행동 데이터를 기반으로 한 이벤트 로깅 및 성과 측정
시작하기 전에
- Firebase 프로젝트 연동 완료
노티플라이 iOS SDK는 푸시 발송을 위해 Firebase Cloud Messaging을 사용합니다.
👉 Firebase 프로젝트 연동 가이드
- iOS APNs 인증 등록
👉 APNs 인증서 등록—
1. iOS 설정
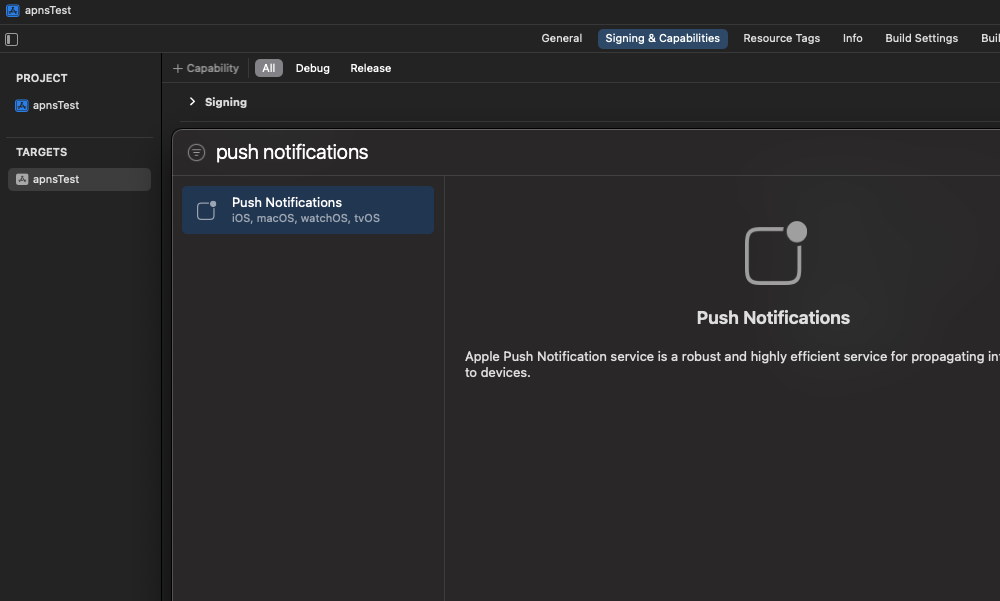
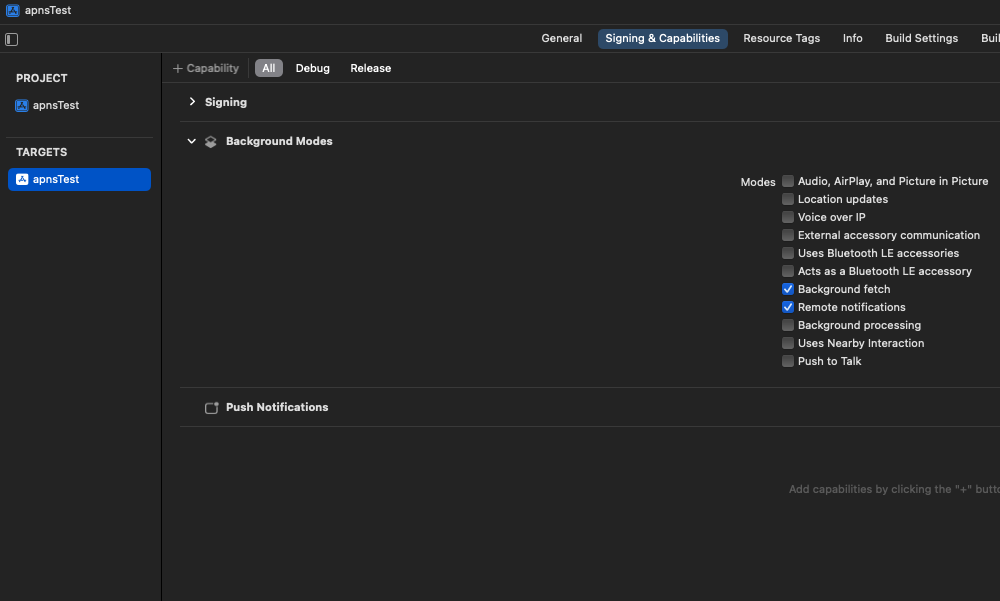
1. Capability 설정
- iOS Deployment Target/Target의 Minimum Deployments을 13.0 이상으로 설정하고, Podfile의 최소 버전도 동일하게 지정합니다.
-
Push Notification 및 Background Mode (Remote notification, Background fetch)를 활성화합니다.
2. iOS SDK 설치
노티플라이 iOS SDK는 CocoaPods 또는 Swift Package Manager를 통해 설치할 수 있습니다.- CocoaPods
- Swift Package Manager
- Xcode 프로젝트에 CocoaPods 설치가 되어있는지 확인합니다. 설치가 되어있지 않은 경우 CocoaPods 설치 가이드를 참고해 주세요.
- Podfile 파일의 상단에 platform :ios, ‘13.0’ 또는 그 이상의 버전으로 입력해 주세요.
- Podfile 파일에 다음 코드를 추가해 주세요.
Podfile
3. AppDelegate 설정
노티플라이 SDK가 iOS 알림 시스템과 통신할 수 있도록 AppDelegate 파일을 수정합니다.1. SwiftUI 프로젝트에서 AppDelegate 생성
SwiftUI 프로젝트에는 기본적으로 AppDelegate 파일이 없을 수 있습니다.
이 경우, 아래와 같이 생성합니다.
AppDelegate.swift
@UIApplicationDelegateAdaptor(AppDelegate.self) var appDelegate을 추가합니다:
<YOUR_PROJECT_NAME>App.swift
2. Notifly 초기화 및 Delegate 설정
노티플라이 SDK를 사용하려면AppDelegate.swift에 다음 코드를 추가하세요.
AppDelegate.swift의 UIApplicationDelegate 함수 내 노티플라이 관련 코드를 추가합니다.
| 함수 이름 | 설명 |
|---|---|
application(_:didFinishLaunchingWithOptions:) | Firebase 초기화 및 노티플라이 SDK 초기화 |
application(_:didRegisterForRemoteNotificationsWithDeviceToken:): | APNs 토큰을 노티플라이에 등록 |
application(_:didFailToRegisterForRemoteNotificationsWithError:) | APNs 등록 실패 시 노티플라이에 알림 |
projectId, username, password는 설정 페이지에서 확인할 수 있습니다. AppDelegate.swift
UNUserNotificationCenterDelegate 프로토콜에 다음 코드를 추가합니다.
| 함수 이름 | 설명 |
|---|---|
userNotificationCenter(_:willPresent:withCompletionHandler:) | 포그라운드 알림 표시 |
userNotificationCenter(_:didReceive:withCompletionHandler:) | 앱 푸시 알림 클릭 이벤트 전달 |
UNUserNotificationCenterDelegate
4. 유저 정보 등록
노티플라이는 유저 식별자(userId)와 유저 프로퍼티(params)를 기반으로 개인화 마케팅 캠페인을 수행합니다.등록된 유저 정보는 세그먼트 분류, 푸시 발송, 이메일 및 카카오 알림톡 등의 타깃팅에 활용됩니다.
1. 유저 ID 등록 (Notifly.setUserId())
userId는 앱 내부의 로그인 유저 식별자와 매핑됩니다.노티플라이는 이 값을 기준으로 유저 이벤트를 추적하고 캠페인을 개인화합니다.
Parameters
로그인 유저 ID. 로그아웃 시
nil로 설정하여 해제유저 ID 해제
로그아웃 시에는setUserId(null)을 호출하여 유저 등록을 해제하는 것이 권장됩니다. 이 호출은 현재 기기와 유저 간 연결을 해제합니다.
따라서, 동일한 유저 데이터를 유지하려면 서버 또는 앱 내부에서 별도로 관리해야 합니다.
- iOS
setUserId
2. 유저 프로퍼티 등록
setUserProperties는 유저의 속성 정보를 등록합니다.이 정보는 세그먼트 타깃팅, 메시지 개인화, 발송 채널 선택 등에 사용됩니다.
Parameters
유저 속성 key-value 쌍.
$email, $phone_number, $line_user_id 등 사전 정의된 키 지원$email: 이메일 캠페인용 주소$phone_number: 문자/카카오 캠페인용 전화번호$line_user_id: LINE 메시지 캠페인용 LINE User ID- 기타 커스텀 필드:
"plan","tier","country"등 자유롭게 설정 가능
- iOS
setUserProperties
5. 이벤트 로깅
유저 행동을 기록하여 캠페인 트리거, 세그먼트 조건, 성과 분석 등에 활용할 수 있습니다.예를 들어 버튼 클릭, 페이지 진입, 구매 완료 같은 유저 행동을 이벤트로 수집합니다.
Parameters
이벤트 이름 (예: “ticket_purchase”)
이벤트에 대한 추가 속성. (예: “ticket_name”: “premium”, “duration”: 120)
세그먼트 분류 시 기준으로 사용할 키 목록 (최대 1개까지 지원)
segmentationEventParamKeys를 활용하여 이벤트 변수 (eventParams)를 발송 대상 설정 등에 활용할 수 있습니다. 최대 1개의 Key만 지정할 수 있습니다.- Swift
trackEvent
6. 내부 유저 ID 확인
getNotiflyUserId() 메서드는 노티플라이가 내부적으로 관리하는 고유 User ID를 반환합니다.이는
setUserId() 로 등록한 유저 ID와는 별개의 식별자이며, 일반적인 상황에서는 사용할 필요가 없습니다.다만 외부 CRM 또는 서드파티 서비스와의 연동 과정에서 내부 User ID 값이 필요한 경우 활용할 수 있습니다.
7. (권장) iOS Notification Service Extension 설정
notifly-sdk 버전 1.3.0 이상부터 지원됩니다. 주요 기능
- 푸시 알림에 이미지 및 비디오 첨부 가능
- 유저의 푸시 수신 여부를 추적하여 캠페인 성과를 세부적으로 분석 가능
8. 연동 테스트
SDK 설치 후 아래 페이지에서 실제 이벤트 및 푸시 수신 여부를 테스트하세요.👉 SDK 연동 테스트
9. 심화 연동
FAQ
이미 Firebase Cloud Messaging을 사용 중인데 어떻게 해야 할까요?
이미 Firebase Cloud Messaging을 사용 중인데 어떻게 해야 할까요?
노티플라이 Android SDK는 기존 앱에서 사용하고 있을 수 있는 Firebase Cloud Messaging과 함께 사용하실 수 있습니다.
SwiftUI를 사용하고 있습니다. 연동 후, 앱 푸시는 작동하는데 인앱 팝업이 작동하지 않는데 무엇이 문제일까요?
SwiftUI를 사용하고 있습니다. 연동 후, 앱 푸시는 작동하는데 인앱 팝업이 작동하지 않는데 무엇이 문제일까요?
- Info.plist에 FirebaseAppDelegateProxyEnabled를 NO(BOOL)로 설정해주세요.
- Firebase 공식 문서에 따르면 특정 문제로 인해 SwiftUI를 사용할 때 FirebaseAppDelegateProxyEnabled를 NO로 설정해야만 정상적으로 작동한다고 합니다.