Client SDK - Flutter
Notifly Flutter Plugin은 노티플라이를 Flutter 어플리케이션과 연동하기 위해 사용할 수 있습니다. 다음과 같은 기능들을 지원합니다:
- 기기 정보를 노티플라이에 등록하여 노티플라이를 통해 발송된 앱 푸시를 Flutter 앱에서 수신할 수 있습니다.
- 노티플라이에서 만든 인앱 팝업 캠페인을 Flutter 앱에서 띄울 수 있습니다.
- Android 플랫폼의 경우, 현재 인앱 팝업은 Android 11 (API Level 30) 이상에서만 지원되며, 이외의 Android 디바이스에서는 인앱 팝업이 표시되지 않습니다.
- 이벤트, 유저 정보를 노티플라이와 연동하여 모든 캠페인에서 활용할 수 있습니다.
- 캠페인의 성과를 측정할 수 있도록 이벤트를 로깅합니다.
노티플라이에서는 푸시를 발송하기 위해 Firebase Cloud Messaging을 활용하고 있습니다. 다음 과정을 먼저 진행해주세요:
1. Notifly Plugin 셋업
1-1. Plugin 설치
Plugin을 설치하�기 위해, 다음을 실행해 주세요:
flutter pub add notifly_flutter
cd ios && pod install
앱 패키지의 pubspec.yaml 파일에 다음과 같이 추가됩니다. (현재 최신 버전: 
dependencies:
  notifly_flutter: ^1.3.5
1.2. iOS 설정
1) Capability 설정
-
Xcode에서 Runner.xcworkspace를 열어주세요.
- Xcode에서 Runner.xcworkspace를 열지 않고 Runner.xcodeproj를 열어서 빌드하면, Notifly Plugin을 사용할 수 없습니다.
- Runner.xcworspace는 Root 디렉토리의 ios 디렉토리에 있습니다.
-
대상 Project의 iOS Deployment Target과 Target의 Minimum Deployments iOS를 13.0 혹은 그 이상으로 설정합니다.
-
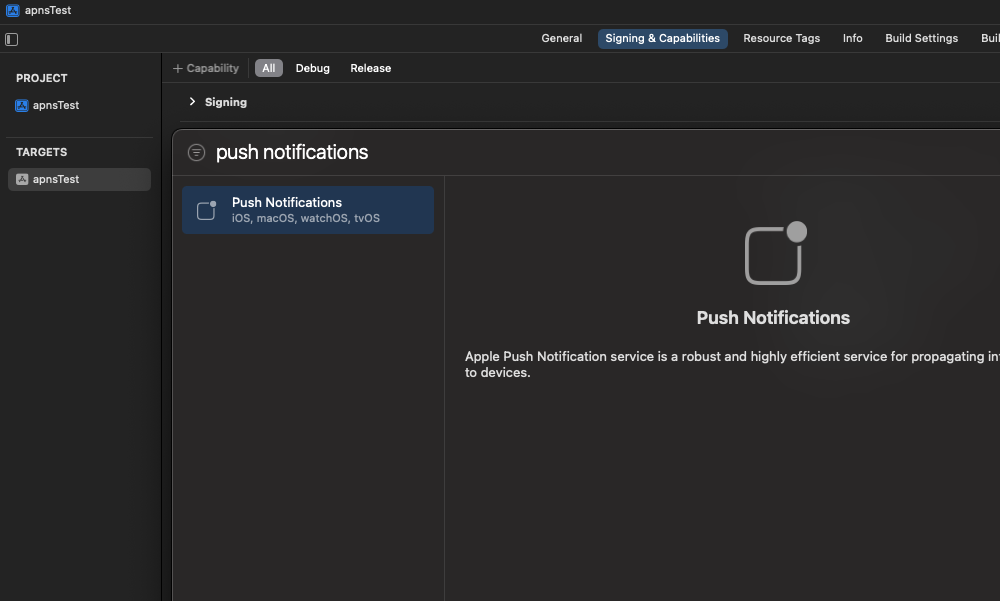
Push Notification Capability를 추가합니다.
-
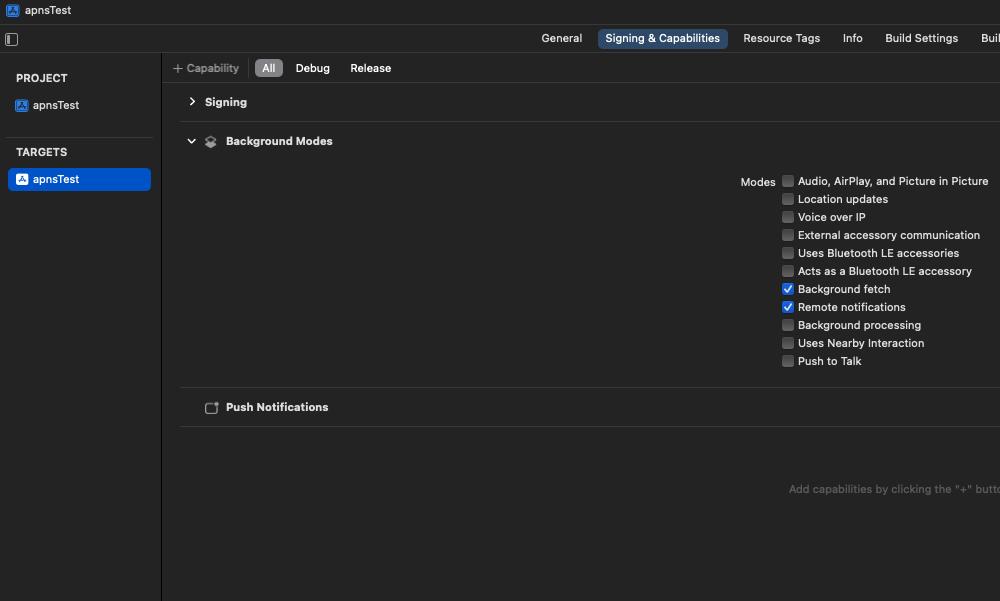
Background Modes Capability를 추가합니다. - Remote notifications과 Background Fetch를 선택합니다.
-
AppDelegate.swift 파일을 열어서 다음 코드를 추가합니다.
- AppDelegate.swift는 ios 디렉토리의 Runner 디렉토리에 있습니다.
notifly_sdk프래임워크를 import 합니다.
import notifly_sdk
- AppDelegate.swift의
FlutterAppDelegate에서 함수들을 override하여 다음 Notifly코드를 추가해 주세요.application(_:didFinishLaunchingWithOptions:)- UNNotificationCenter의 delegate를 self로 설정합니다.
application(_:didRegisterForRemoteNotificationsWithDeviceToken:)- APNs 토큰을 노티플라이에 등록합니다.
application(_:didFailToRegisterForRemoteNotificationsWithError:)- APNs 토큰 등록에 실패한 경우, 노티플라이에 알립니다.
userNotificationCenter(_:willPresent:withCompletionHandler:)- 앱이 실행 중일 때, 앱 푸시 알림 트래픽을 노티플라이로 전달합니다.
userNotificationCenter(_:didReceive:withCompletionHandler:)- 앱 푸시 알림 클릭 이벤트를, 노티플라이로 전달합니다.
- Swift
import Flutter
import notifly_sdk
import UIKit

@UIApplicationMain
@objc class AppDelegate: FlutterAppDelegate {

    override func application(
        _ application: UIApplication,
        didFinishLaunchingWithOptions launchOptions: [UIApplication.LaunchOptionsKey: Any]?
    ) -> Bool {
        GeneratedPluginRegistrant.register(with: self)
        UNUserNotificationCenter.current().delegate = self
        return super.application(application, didFinishLaunchingWithOptions: launchOptions)
    }

    override func application(
        _ application: UIApplication,
        didFailToRegisterForRemoteNotificationsWithError error: Error
    ) {
        Notifly.application(application,
                            didFailToRegisterForRemoteNotificationsWithError: error)
        super.application(application, didFailToRegisterForRemoteNotificationsWithError: error)
    }

    override func application(
        _ application: UIApplication,
        didRegisterForRemoteNotificationsWithDeviceToken deviceToken: Data
    ) {
        Notifly.application(application,
                            didRegisterForRemoteNotificationsWithDeviceToken: deviceToken)
        super.application(application, didRegisterForRemoteNotificationsWithDeviceToken: deviceToken)
    }

    override func userNotificationCenter(_ notificationCenter: UNUserNotificationCenter,
                                        didReceive response: UNNotificationResponse,
                                        withCompletionHandler completion: @escaping () -> Void)
    {
        Notifly.userNotificationCenter(notificationCenter,
                                    didReceive: response)
        super.userNotificationCenter(notificationCenter, didReceive: response, withCompletionHandler: completion)
    }

    override func userNotificationCenter(_ notificationCenter: UNUserNotificationCenter,
                                        willPresent notification: UNNotification,
                                        withCompletionHandler completion: @escaping (UNNotificationPresentationOptions) -> Void)
    {
        Notifly.userNotificationCenter(notificationCenter,
                                    willPresent: notification,
                                    withCompletionHandler: completion)
        super.userNotificationCenter(notificationCenter, willPresent: notification, withCompletionHandler: completion)
    }
}
1-3. (권장) iOS Push Extension 설정
notifly_flutter: 1.2.2 버전 이상
- Notifly의 안내에 따라, Notification Service Extension을 설정하시면 다음 기능들이 지원되기 때문에, 설정하시길 권장드립니다.
- 푸시 알림에 이미지 및 비디오를 첨부할 수 있습니다.
- 유저의 푸시 수신 여부를 확인할 수 있어, 캠페인 성과를 보다 자세하게 확인하실 수 있습니다.
1-4. Notifly Plugin 초기화 코드 추가
Notifly Plugin을 사용하기 위해, 다음과 같이 Notifly Plugin을 초기화하는 코드를 추가해주세요. 다음은 dotenv를 사용하여 환경변수를 읽어오는 예시입니다.
import 'package:notifly_flutter/notifly_flutter.dart';

void main() async {
    WidgetsFlutterBinding.ensureInitialized();
    await NotiflyPlugin.initialize(
        projectId: dotenv.env['NOTIFLY_PROJECT_ID']!,
        username: dotenv.env['NOTIFLY_USERNAME']!,
        password: dotenv.env['NOTIFLY_PASSWORD']!,
    );
}
NOTIFLY_PROJECT_ID, NOTIFLY_USERNAME, NOTIFLY_PASSWORD 값은 노티플라이 홈페이지의 설정 페이지에서 확인하실 수 있습니다.
2. 유저 프로퍼티 등록하기
- 노티플라이에서는 유저의 아이디 (userId) 및 프로퍼티 (params)를 설정하여 마케팅 캠페인 집행 시에 활용할 수 있습니다.
- 노티플라이에서는 채널 별 푸시 알림 수신 동의 여부를 유저 프로퍼티로 설정하여, 푸시 알림 전송 전에 필터링 할 수 있습니다.
- 카카오 알림톡, 친구톡, 문자 발송을 위해서는 전화번호를 유저 프로퍼티로 설정해야 합니다.
- 이메일 발송을 위해서는 이메일 주소를 유저 프로퍼티로 설정해야 합니다.
- 전화번호와, 이메일의 프로퍼티 필드명은 꼭 각각 $phone_number, $email로 설정해 주세요.
- Notifly SDK 초기화 코드 추가를 마친 후 프로퍼티 등록을 시작해 주세요.
- (권장사항) 로그아웃 시 userId를 null로 하여 setUserId 호출함으로써 기기와 유저의 연결을 해지해 주세요.
- (권장사항) 탈퇴 유저는 Delete Users API를 구현하여 유저 정보를 삭제해 주세요.
2-1. 유저 아이디 등록
| Parameter | Type | Required |
|---|---|---|
| userId | String | No |
NotiflyPlugin.setUserId(userId)
ElevatedButton(
    onPressed: () async {
        try {
            final userIdInput = _userIdTextInputController.text;
            await NotiflyPlugin.setUserId(userIdInput); // Set User Id
        } catch (error) {
            ...
        }
    },
    child: const Text('Set User Id'),
    ...
),
ElevatedButton(
    onPressed: () async {
        try {
            final userIdInput = _userIdTextInputController.text;
            await NotiflyPlugin.setUserId(null); // Unregister User Id
        } catch (error) {
            ...
        }
    },
    child: const Text('Unregister User Id'),
    ...
),
2-2. 유저 프로퍼티 등록
| Parameter | Type | Required |
|---|---|---|
| params | Map<String, Object> | Yes |
NotiflyPlugin.setUserProperties(params)
ElevatedButton(
    onPressed: () async {
        try {
            final value = _userPropertiesValueInputController.text;
            await NotiflyPlugin.setUserProperties({'name': value});
        } catch (error) {
            ...
        }
    },
    ...
),
3. 이벤트 로깅
- 노티플라이에서는 유저의 행동 등 이벤트를 트래킹하여 캠페인 집행 시 타겟팅에 활용할 수 있습니다. 트래킹 된 이벤트는 푸시 알림 발송 타이밍, 발송 대상 설정 등에 활용할 수 있습니다.
- Notifly SDK 초기화 코드 추가를 마친 후 이벤트 로깅을 시작해 주세요.
- segmentationEventParamKeys 활용하여 이벤트 변수 (eventParams)를 발송 대상 설정 등에 활용할 수 있습니다. 이를 위해서, 발송 대상 설정에 사용할 eventParams의 특정 field의 key 값을 segmentationEventParamKeys에 지정해주세요.
- 현재는 segmentationEventParamKeys 한 개까지 지원하고 있기 때문에, segmentationEventParamKeys 길이는 1이하인 List이어야합니다.
3-1. 이벤트 로깅
| Parameter | Type | Required |
|---|---|---|
| eventName | String | Yes |
| eventParams | Map<String, Object> | No |
| segmentationEventParamKeys | List<String> | No |
NotiflyPlugin.trackEvent(params)
...
await NotiflyPlugin.trackEvent(
    eventName: 'click_button_1',
    eventParams: {'show_id': show_id},
);
...
4. (Only Web) Service Worker For Web Push Notification 등록
Flutter Web에서 웹 푸시 알림을 사용하지 않으시는 경우, 이 단계는 생략하셔도 됩니다.
- Flutter 프로젝트의 web 폴더 내에 notifly-service-worker.js 파일을 생성합니다.
- notifly-service-worker.js 파일에 다음 코드를 추가합니다.
self.importScripts(
  "https://cdn.jsdelivr.net/npm/notifly-js-sdk@2/dist/NotiflyServiceWorker.js",
);
5. (Only Web) 웹 푸시 알림 권한 요청
Flutter Web에서 웹 푸시 알림을 사용하지 않으시는 경우, 이 단계는 생략하셔도 됩니다.
-
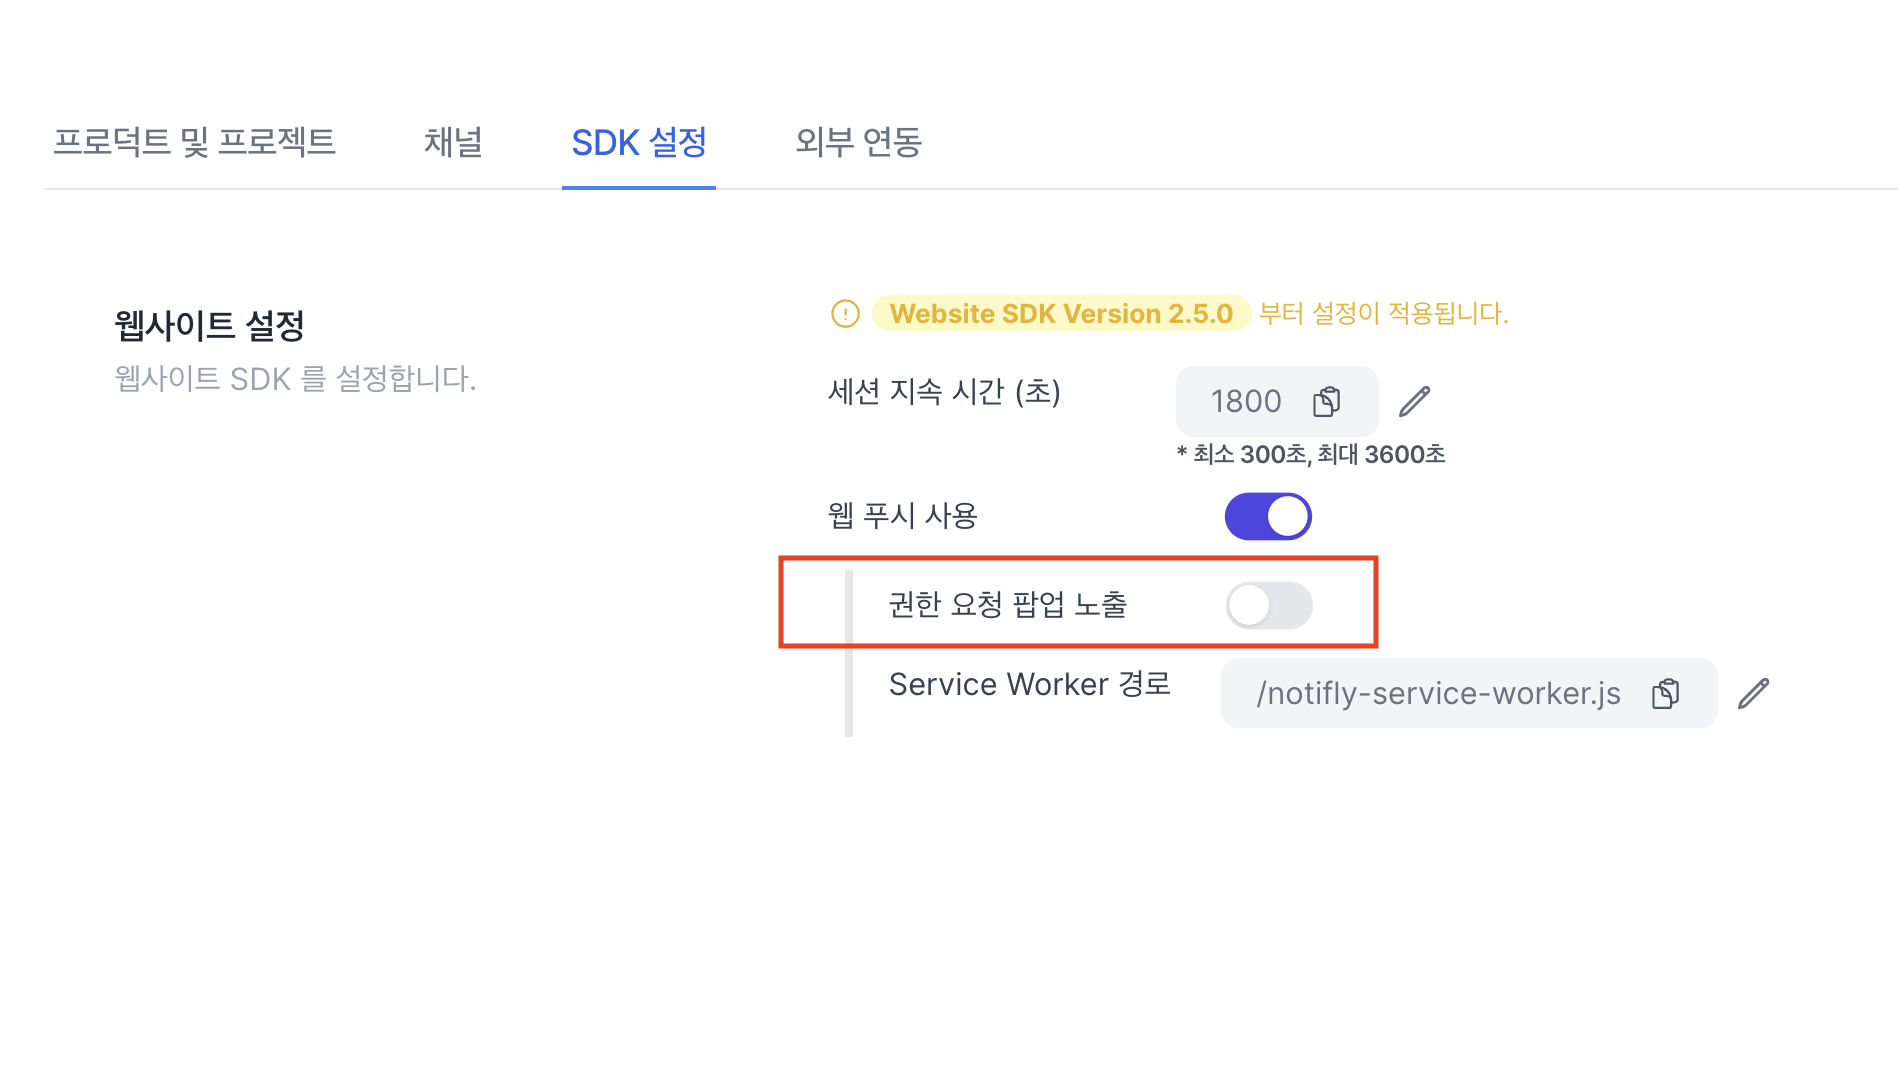
노티플라이 콘솔 > 설정 > 웹 푸시 알림 설정에서 권한 요청 팝업 노출 토글을 ON/OFF 할 수 있습니다.
-
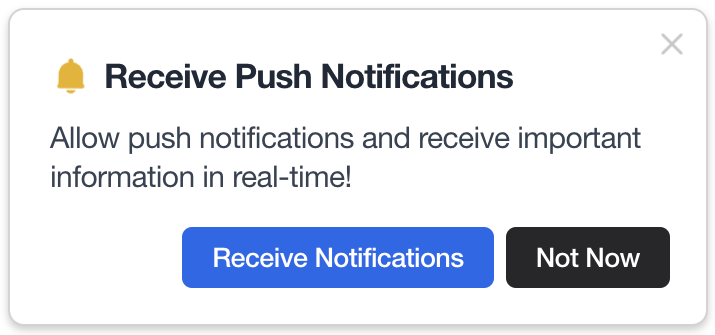
ON인 경우, 노티플라이는 웹사이트에 방문한 사용자에게 웹 푸시 알림 권한을 요청하는 팝업을 노출합니다.
-
OFF인 경우, 아래 NotiflyPlugin.requestPermission()를 호출하여 원하는 시점에 권한 요청 팝업을 노출할 수 있습니다.
-
푸시 알림 권한 요청은 다음과 같이 동작합니다.
- 사용자가 아직 브라우저에서 알림 권한을 설정하지 않은 경우 팝업을 보여줍니다.
- 사용자가 이미 알림 권한을 부여한 경우에 노티플라이는 팝업을 보여주지 않고 알림 권한을 다시 요청하지 않습니다.
- 사용자가 알림 권한을 거부한 경우에도 노티플라이는 팝업을 보여주지 않고 알림 권한을 다시 요청하지 않습니다.
- 아래 NotiflyPlugin.requestPermission 함수는 콘솔에서 설정한 권한 요청 팝업 노출 옵션이 OFF로 설정 되어있는 경우에만 동작합니다.
NotiflyPlugin.requestPermission();
5. 연동 테스트
Client SDK - 연동 Test 섹션에서 테스트를 진행합니다.
6. (Advanced) 푸시 알림 클릭 이벤트 구독
(Advanced) Client SDK - Flutter 를 참고해 주세요.
7. (Advanced) 푸시 알림 아이콘 등록 (Android) & 푸시 알림 동의 프롬프트
(Advanced) Client SDK - Flutter 를 참고해 주세요.
8. (Advanced) Notifly User ID 가져오기
- 노티플라이에서 내부적으로 관리하는 유저 ID를 반환하는
getNotiflyUserId메소드를 제공합니다. - Notifly User ID는
setUserId로 설정한 유저 ID와는 다른 내부 식별자이므로 사용 시 혼동하지 않도록 주의해주세요. - 일반적인 상황에서는 사용할 필요가 없으나, 특정 외부 서비스와의 연동 과정에서 Notifly User ID가 필요할 경우 활용할 수 있습니다.
- 웹 환경에서는 지원되지 않으며, 호출 시
null을 반환합니다.
NotiflyPlugin.getNotiflyUserId();
FAQ
- Q. 이미 Firebase Cloud Messaging을 사용 중인데 어떻게 해야 할까요?
- A. Notifly Flutter Plugin은 기존 앱에서 사용하고 있을 수 있는 Firebase Cloud Messaging과의 충돌을 방지하기 위한 처리를 이미 자체적으로 구현해 두었기 때문에 안전하게 사용하실 수 있습니다.